
Before getting technical into electrical systems, we need to discuss the usage you will have with your van or camper conversion. In order to simplify the amount of work being done to accomplish your goal, I have organized the electrical build in LEVELS in order to maximize cost, space, weight, and project planning of your conversion. The higher the LEVEL option, the more expensive, bulky, but capable the system will be. All options will require the purchase of a breaker and fuse block to add 12v accessories. I recommend most options to start with this Blue Sea 100amp breaker and the 12 circuits fuse block with some copper 4 AWG wires connected at less than 10 feet (1 foot for the breaker) from battery. BEWARE: most of the mistakes made during DIY electrical installs are from improper wire size (gauge / AWG). Following a preexisting diagram found online is a good place to start but every custom build will require different length of wire to power a circuit and as such a different wire size AWG than the one shown on the graph. For more information on how to pick the right wire AWG, scroll down to the end of this post. Working with electrical is dangerous, educate yourself, and ask for a professional if you don't feel comfortable during installation.


LEVEL 1: is going to be for people who want to run a 12v single compartment fridge, a few led lights, and the ability to charge their phone or tablet at night while still being able to add an air compressor, lights, radios, etc on their secondary battery while alleviating the risk of being stranded. This stage is meant to be cost effective and for those who aren't planning at staying at the same spot for longer than 24h. Effectively driving at least 45 min once a day, depending on alternator power, will reduce the need for solar panel, and solar controller. You will need to add a MPPT (more efficient) solar controller if you wish to have some solar panel charging and not have to drive (see level 2 if solar is a requirement). Another advantage of this system is that it can all be hidden under the hood of most trucks.
- Secondary Battery AGM such as the Yellowtop Deep Cycle from Optima (group 34 AGM = 50ah which is close to 35ah lithium)
- Battery Isolator to prevent the starting battery from being drained and leaving you stranded. A good simple option would be: Blue Sea BatteryLink 120amp Si-ACR for cost, Redarc, or National Luna which includes a state of charge SOC monitor (lets you know how charged your battery is, instead of a simple voltmeter).
- Solar is optional but if you want your 12v fridge to run on solar then add 100w solar monocrystaline panel with a MPPT solar controller such as the Victron 75/15 which will be good for up to 200w solar charging in 12v. The Zamp Obsidian 100w is the best option and the Renogy Compact would be a good more affordable alternative. However, if you want more than 100w solar, I would look at LEVEL 2 below.


Note: the Bluesea SI-ACR will require a small 1amp negative wire to connect to ground battery terminals not shown in graph.
LEVEL 1 Main Components:


Here's an example of a LEVEL 1 + MPPT controller with 100w solar panel I built for a Tacoma tucked under the hood:

LEVEL 2 or higher is for people who want to be off the grid at the same location, no driving, for more than 24h. It considered the best value, and the whole diagram below can all easily fit (not including solar panels) in a 15x30" box. It is intended for people who want a larger dual compartment fridge/freezer, charge computers, add many accessories such as a cellular booster, air compressor, powerful lights and maybe an inverter 110v to run a coffee machine every once in a while (Note: one 100ah lithium battery will only power up to 1200w on a 110v inverter). It will include at least 100w of solar, to reduce driving need and save on gas from alternator charging of battery.
- Secondary Battery Lithium of at least 50ah LifePo4 (yes, in 2023, lithium is becoming the standard choice). If you are going to commit to doing the install, I recommend 100amp an hour such as BattleBorn, Victron, Renogy, since it is the same amount of work regardless of single battery capacity. You will preferably want a battery with an integrated BMS (Battery Management System) and Heated Casing if you are going to travel in sub freezing temperatures.
- DC to DC 20amp+ battery isolator, alternator & solar charger all in one such as the National Luna NLDC25 w/ display or the basic Manager 30. If you wish to save money you can use the Blue Sea battery isolator from stage 1 and add a MPPT solar controller; however this setup will require running more wires and will be more limiting if you decide to expand your system in the future. Redarc Redvision Manager 30 kit (All-in-3: solar controller, alternator charger, fuse block, switch panel, SOC monitor, & Inverter) would be the most capable but expensive setup for LEVEL 2 (See Video at 12:50).
- Solar panel(s) The rule of thumb for 100% off the grid (no driving) is 2:1 ratio (200w solar for 100amp Lifepo4 battery). This configuration guarantees that even on an overcast day, you will still compensate for your fridge/freezer and other basic appliances. It will also guarantee, on sunny days, if you decide to run heavy appliances on 110v inverter that solar can keep up. If you don't plan on having an inverter, or you don't mind driving once or twice a week, or the inverter won't often be used for a coffee machine, microwave, tools, etc, then the 1:1 ratio might be enough for your use (100w solar for 100amp battery). With a 25amp charger mentioned above you will be able to run up to 400w of solar.
- Inverter (optional) to convert 12v current to 110v and be able to run home appliances which require a high wattage. I recommend at least a 1500w inverter capable, since most coffee machines peak at 1300w and microwave 1100w. This will also cover the need for many electric tools. Most cheap inverters have a 30% loss conversion rate, higher end inverter may loose less 10% power while converting from 12v to 110v; make sure it has True Sine Wave output to prevent damage to sensitive equipment. You can use the Xantrex PROwatt SW1000 or my favorite the Xantrex PROwatt SW2000, since it can run continuously 1800w, peak at 3000w, and is fairly efficient; it can also be turned on/off with ignition or an external switch. Important: if you only have one 100amp Battleborn battery for example, you are little limited to 200amp for 30sec cranking power (less than 1200w appliances), meaning that you won't be able to put a 250amp breaker and use the full power of the SW2000 inverter until you add an additional battery (100amp x2) which will give you 400amp for 30 sec (see stage 3 if you wish to use a 2000w inverter's full power which can deliver continuously 15-20amp similar to your home outlets). Note: there is a small wire ground to chassis that needs be added from inverter.


I'm using the National Luna NLDC system in both LEVEL 2 & 3 for ease of comparison and because they are good value.
LEVEL 2 Main Components:
National Luna option:


Redarc option:
![]()

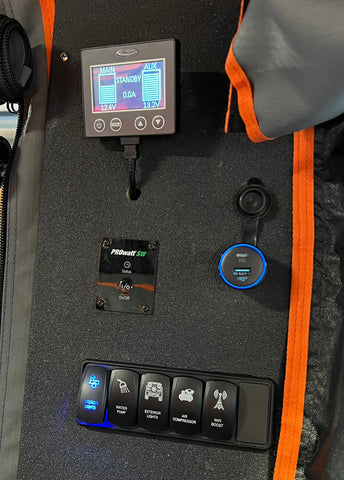
Here's an example of an electrical system I built with a remote switch panel and an aluminum wheel well cabinet topped with matching orange grip to hide the system. It's a LEVEL 2 + inverter and 100w solar panel built for a Tacoma with an Alucab camper:

LEVEL 3 is for the dedicated off the grid overland camper van that "doesn't want to worry about lack of power", and will need to use an inverter for Microwave, Coffee Maker, and maybe a TV as needed but is not interested in running an Air Conditioner.
- Two, three, or four 100amp lithium auxiliary batteries in parallel for an equivalent of 200 to 400ah capacity in 12v.
- DC to DC 40amp+ battery isolator, alternator & solar charger all in one such as the National Luna NLDC40 w/ display , Redarc 40amp, they come with an optional SOC screen for all the necessary info; Redarc even has a full smart all in one switch panel fuse block controller. These two overland companies offer very compact, lightweight, high quality powerful solutions for most of your charging needs with years of experience in harsh climates of Australia and South Africa. You may start benefiting from larger, heavier, and more complex system such as Victron if you decide to expand beyond 400amp+ of batteries and 600w+ of solar (see stage 4).
- Solar Panels 200 to 600w. With a 40amp DC to DC charger mentioned above you will be able to run up to 600w of solar. Redarc now makes a 50amp version if you need a little more; otherwise, I recommend looking at Victron.
- Inverter: you will want the full power of a 2000w+ plus inverter such as the Xantrex PROwatt SW2000 w/ remote switch. With this LEVEL, you will start benefiting from a positive and negative Busbar to declutter the auxiliary battery terminals. Make sure your Busbars are rated for 400amp if necessary. You will also want to pay attention to terminal diameter (5/16, 3/8, etc) to make sure everything matches and preferably in stainless steel to avoid corrosion.
- Shore Charging is optional since you already have solar and alternator but with the NLDC40 and some Redarc models, you can add an auxiliary charger up to 15 amp. I recommend the Lithium 15amp Victron Energy Blue Smart 12v Battery charger / maintainer. This shore charging setup isn't as powerful as the one found in LEVEL 4 but it will work very well for most applications.
- 12v Air Conditioner only can be used since even 400ah of lithium batteries would be depleted in less than two hours with a 15,000 BTU 110-230v AC. With 400amp capacity, you could get close to the full night (8h) with a 12v Air Conditioner such as the Dometic RTX2000 but you would only get 7000 BTU max of cooling and it is more expensive. As such, I recommend installing a 110v AC such as the Dometic Penguin II (11,000 BTU) only if you have 600ah+ lithium capacity, or you will be using a generator, or you will only use it while on shore power. If you need higher voltage, you can add a Xantrex Freedom X which is a 230v Inverter. However, I would instead start considering LEVEL 4 below for those requirements.


LEVEL 3 Main Components:


Level 3 (200ah + 400w solar) NLDC40 with Victron charger is the setup I'm running in my Sprinter 4x4. Even when I'm using the lights, 73QT fridge/freezer 24/7 along with daily use of 110v coffee machine and microwave, I am always full just from solar.
LEVEL 4 will require to dedicate much more real-estate, cost, and complexity in you conversion. This is when you may benefit from the Victron full setup since you may want powerful shore charging capabilities, many continuous 15-20amp 110v outlets, and one large load Air Conditioner, along with a powerful desktop, large TV monitor, microwave, you name it. Before talking about Victron, new for 2024 is the Redarc Alpha Manager 100 which is now my personal choice for most people. Another alternative to Victron is the Ecoflow Power kits. Level 4 setups have many variables based on needs/desires. If Victron is the system you wish or need, I will redirect you to the Victron Community and Van Life Outfitters blog for much more technical information. Tiny Watts is a great but a pricey option for a completely built system. Note: In the USA, the grid is 110/120v and in Europe 220/230v, so wiring diagrams may change regarding inverters and shore charger depending on location. Here's an introduction to the system:
- 500ah+ Lithium Batteries in parallel (12v) or series 24v+). With this setup you may start benefitting from having Victron LifePo4 batteries WITHOUT the internal BMS and instead use the external Lynx Smart BMS. Batteries without BMS are more compact and having one on every battery would increase cost, space and be redundant.
- Victron Multiplus 12v or 24v charger inverter will enable shore charging and 110v inverter output. With this setup, you will probably also want an AC (house type) breaker electrical panel. The Multiplus needs to be combined with the Victron DC Lynx Distributor which is a smart and fancy fused busbar to connect everything. One or two Orion Tr for fast alternator charging to connect starting battery, be careful because there's an isolated and non-isolated version which will depend on setup. With 500ah+ auxiliary batteries, you may want to consider a second powerful alternator, particularly if you only have 400w of solar or less. If you want 230v, and your are in the US, you will also need the Victron Isolation Transformer. If you want to also monitor in detail your system, then you need to add the Cerbo GX which has a bluetooth app and the additional GX Touch for phone-less monitoring. A cheaper, but more simple SOC monitor alternative would be the Victron BMW-702 which doesn't require the Cerbo GX and other associated parts, and can be made bluetooth with the VE Direct Smart Dongle. However, It seems to me that if you are going to go the Victron route, you might as well benefit from the whole smart ecosystem which requires GX Touch and Cerbo; at this point, you will want to also complete the Lynx distribution system with the Lynx Power In which is another SOC busbar but to connect all your batteries together, and the Lynx Shunt VE Can connected to the Lynx distributor to fuse and relay all that info to the Cerbo.
If you are wondering why I haven't recommended the Victron systems until now, it is not because I dislike Victron, it's actually really good quality, the reason is that this system was originally designed for houses, yachts and large motorhomes. As such, it is much bigger, heavier and complicated to setup and I believe many people could benefit from actually installing a dedicated overland vehicle system such as Redarc or National Luna in their vans since they don't actually need everything the Victron setup provides. Space is gold in a conversion!
- Ideally 600w+ solar power with Victron 100/50 (600w-700w) or 150/60 (800-900w) or 250/70 (1000w of solar) SmartSolar MPPT controllers (Here's a good solar calculator and for Victron MPPT. The Victron MPPT controller(s), just like the Orion Tr, will connect to the Lynx distributor. At this point, it is not longer a matter of solar to battery ratio 1:1 or 1:2, it is more a problem of real estate on the roof to add more solar. Most conversions have a hard time finding space for more than 400w of solar. So the ideal ratio falls apart and you will want as much solar as possible since you will probably have more battery capacity than solar abilities. As such, if you use the full extent of your batteries within a 24h period such as with a 110v air conditioner, you will need to drive, or use a generator, or plug in shore power to recharge fully if you keep using the AC as you did the previous day. Ideally, you wouldn't use so much power within a 24h period, or two days in row, to enable solar panel input to slowly catch up. Driving with a secondary alternator would solve that problem but increase gas consumption. Some good options for extra solar space, could be on the hood such as the one from Cascadia 4x4 or a roof box with solar like the one from Tiny Watts.

Victron setup with Lithium Batteries internal BMS but without Cerbo and lynx ecosystem (Cerbo GX, GX Touch, Lynx Power In, Lynx Shunt VE Can)

LEVEL 4 Main Basic Components (Without Cerbo and Lynx Ecosystem):


Additional solar mounting solutions:


There is a 5th option that I will call "LEVEL 0", it isn't the cheapest. It is a portable solar power station such as the Goal Zero, Jackery, etc, and it is the easiest but most limiting setup. It simply requires a compatible alternator charger, compatible solar panels, and a small fuse block to wire some 12v accessories. It's an all in one, battery, solar controller and inverter. It is intended for the "car camper"; people who aren't interested in modifying their vehicle too much and who just wants to charge their phone, laptop, and maybe a fridge which isn't permanently mounted. It is also for those who lack time/desire to learn how to setup an electrical system or need portabilty. The devices can be easily removed after the annual camping trip and then used for other purposes. Why is that not the best option for everyone? Because this system is highly dependent on the inverter running 110v house outlets to power devices. Most of the units I looked at, had one 12v cigar outlet, which would be used for the fridge most likely, two 2.1amp USB for your phones, and then one Anderson type outlet which has a max 12v rating of 30amp output. Out of this 30amp 12v outlet, you will still need to add a fuse block and run wires to connect all your lights and accessories, defeating the reason for buying an all in one system. The other AC home outlets require the inverter to be switched on, loosing efficiency and the ability to run most 12v overland or camper conversion accessories. For example, just an ARB air compressor requires a 40amp fuse which exceeds the max 12v output of the unit. This means that if you go with that setup, you will be connecting your 12v air compressor, powerful off road LED lights, radio, and maybe your heater, water pump, etcetera to your starting battery which puts you at risk of being stranded. Another downside would be battery replacement, and issues with a component inside the enclosed system which can't be replaced easily, or replaced at all after a couple of years when this particular model becomes obsolete. I recommend this setup as a temporary solution for people who may switch vehicle, those who aren't interested in modifying their vehicle but want a fridge and the ability to charge phone, computer, and maybe power a coffee maker or inflate a mattress once a day during a road trip. It is important to note that if you decide to use the 110v home outlets a lot, the portable boulder 100w solar panel included with this setup won't be enough to recharge the battery fast enough and you will need to add an alternator charger such as the Yeti Link V2. Overall, the advantage of LEVEL 1 over LEVEL 0 solar power banks is that you can run an air compressor, radios, off road lights and other 30amp+ 12V devices off your secondary battery; it is also replaceable and upgradable over time. There's a purpose for such device, but in my opinion, it isn't the best option for a dedicated overland truck or camper van conversion.
LEVEL 0 Main Components:


Important additional questions and answers:
How to understand wire gauge (AWG)? Is 4 AWG the same as 4/0 AWG? Are copper wires as good as aluminum?
Gauge or AWG determines the size of the wire. The smaller the number, the bigger the wire (ex: 14awg is bigger than 16awg). This is true until you reach 0awg; if you want bigger than 0 then you will need to buy 1/0. It gets confusing, but below ../0, the bigger the first number the larger the wire is now (ex: 1/0 is smaller than 2/0). The biggest common standard size wire is 4/0, then you will need to use metric size format if you wish to go bigger. However, for a camper conversion, you should never need to go bigger than 4/0. For perspective: 4/0 Is the size I would use to connect auxiliary batteries together or for a powerful inverter. 6 or 8 awg are commonly used for connecting solar panels or DC to DC alternator charger. Meanwhile, 16 or 18 awg would be used for connecting small cabin led lights and 12 or 14 awg might be used to connect an air compressor or off-road lights. Look at the chart below or the digital calculator to determine appropriate wire size. Important: make sure all your wires are made of 100% copper, aluminum will create more resistance (not as good of a conductor) which will increase heat build up and as such is less safe. Some companies manufacture aluminum wires that are copper coated, cut the wire to make sure. DO NOT get confused between AC (115v/230v) and DC (12v/24v) current systems and their associated wire labels. We are discussing DC wiring, not AC found in houses which will have wires labeled as such: 14/2 or 12/3 (AWG / # of wires), most often colored white, black, and green.
How to decide which wire gauge AWG to use to power my 12v accessories?
As mentioned above, make sure all your wires are copper only, not aluminum to properly evaluate your needs. The only safe way to decided on wire size is to use a chart such as the one from Blue Sea below. (1) Find out how much power the accessory you are installing requires and the appropriate fuse. (2) How far from the fuse block or power source do you plan on installing that item, while taking in consideration the route the wire will follow. (3) Look at the chart, focus on critical voltage for length since we are going to assume that all installed accessories are sensitive to voltage changes; then look at the amperage your device will demand. Once you know the length and power, you will be able to determine the wire gauge AWG needed to complete the installation (Ex: for 15amp, I can use a 14awg wire for as long as 6 feet. If I need to to install my accessory at 8 feet, I will need to use a 12awg wire). Remember, when in doubt, not that you should ever be following these steps, always use a bigger wire and a smaller fuse than necessary to be safe. You DO NOT want to use too small of a wire and too big of a fuse. ALWAYS ADD A FUSE. The main downsides to using a little too big of a wire is cost, flexibility of wire during installation, and minor voltage change. If you have a circuit that requires more than 200 Amp then use the digital wizard circuit calculator from Blue Sea.

(Use the 3% Critical Voltage Drop for length calculations)
How do I connect switches and do I need a relay?
Every switch brand will have a different pole pattern on the back but the principle remains the same for all of them (graph of pattern should be included with the switch). You will have at least two poles on the back, one positive + in (from power source) and one positive + out (towards accessory). When the switch is turned on, it connects the in+ with the out+ which turns on your accessory. Some switches will have a light when turned on, so you will also need to add a negative ground - (from source) to the switch for the light and connect the positive in+ #2 from the positive + out to have the light on when switch is turned on too.
Regarding the relay, it depends on two factors: (1) how much power is required for the accessory you are powering (2) how much amperage is the switch you purchased rated for. Most switches are rated for 10 or 15 amp, high quality swithes such as the customizable ones from OTRATTW are rated for 20amp before a relay is needed. Relays are intended to protect the switch from running too much power.

Is there a better alternative to the typical standard fuse block and switches?
Yes, there are much easier and better options in the 21st century to reduce wiring time and clutter associated with standard switches. The first solution that comes mind are the SPOD switches and fuse block which was recently purchased by Baja Designs. My favorite is the SPOD Bantam X. It will also add features such as momentary on, strobe, bluetooth phone control, and it will be safer because it won't require to pick the fuse since it is smart and self healing. It doesn't need relay either for up to 30amp! It will also turn automatically off if a switch is on and no power is detected after a certain time. The only downside is cost. Which is why I have a combination of SPOD and standard OTRATTW switches in my conversion.

What is the difference between wiring batteries in series vs parallel?
It depends on usage and rating of components. Most people will want to wire in parallel because it maintains the 12v rating which is most common for accessories but it also reduces stress on the 12v batteries, making them last longer. You will want to wire your batteries in series when you are trying to achieve 24v+ for heavy duty systems such as those found with Victron LEVEL 4 configurations which may benefit from the higher voltage.
Rigid vs Flexible solar panels?
Rigid is more efficient, particularly in hot climate, since it benefits from additional cooling below the solar cells instead of being glued like flexible panels often are. Solar panels produce most energy during a sunny winter day. A benefit of flexible solar panels will be weight and aerodynamics due to low profile. No matter the option, always make sure it is mono-crystalline and not poly-crystalline and make sure that your solar panel has newer technology so that when a panel is partially obstructed by shade, snow, dust, it stills produces power. My favorite panels for now are the Zamp Obsidian, which is now owned by Dometic. The Obsidians are rigid solar panels that have less than a 0.5" slim profile with a track based frame for easy attachment, and a strong glass to protect the cells on top.
What is better Fuse or Breaker? Is there a difference?
Breaker and Fuse both accomplish the same task which is to protect the circuit's wires along with the connected device by breaking or disconnecting the power source which will prevent heat build-up and a possible fire. The fuse or breaker will be rated for the amperage needed for that circuit and is based on the wire size and power needs of the accessory. Ideally, place fuse or breaker at less than 20 inches from power source.
To answer the first question, fuses are safer since there aren't any mechanical parts that can fail, or get stuck preventing disconnect. They function with a filament or thin metal flange that will snap and need to be replaced if the amperage exceeds its rating. However, a breaker isn't unsafe by any means and will enable you to turn on/off the circuit as needed with the flip of a switch.
LifePo4 Lithium vs AGM vs Lead Acid batteries?
LifePo4 lithium is definitely the future, it is now even available as a starting battery with up to 1500 cranking power and it weights 1/3 of a standard battery from Antigravity or the new but smaller Optima OrangeTop. A 100 amp an hour lithium battery has more capacity usage than equivalent 100ah AGM. Lifepo4 batteries can be discharged much more without being submitted to damage, and have more cycles which will make them last longer. As such, 100ah lifepo4 lithium = 80ah capacity usage and 100ah AGM = 50ah of capacity usage for a total of over 30% capacity difference between equally rated batteries. Another benefit of lithium is that it can be placed in every direction. Downside to lithium will be cold temperature capacity loss, but a high quality lithium battery with a BMS and heated casing should be able to compensate for some of this issue. AGM would be the second best option, it isn't as flexible as lithium when comes to mounting solutions but most can still be mounted sideways which isn't the case for standard lead acid batteries. AGM can be found in Deep Cycle format which allows the battery to be discharged lower and more often than acid without damage. Note: a fully charged lithium battery reads 13.6v and it requires more than 14.4v to charge properly; so make sure to use a specific lithium charger or battery maintainer.
-----
As always, this article is written to the best of our knowledge and is continuously updated. Feel free to comment or message us for questions or if you think some additional information is needed.
-----
Disclosure: Some recommendations and links in articles, blogs, images, and videos may originate from collaborations with vendors (see bottom Main Page of gearforexperiences.com for a complete list of sponsors and collaborations).